<!doctype html>
<html lang="en">
  <head>
    <meta charset="UTF-8" />
    <meta http-equiv="X-UA-Compatible" content="IE=edge" />
    <meta name="viewport" content="width=device-width, initial-scale=1.0" />
    <meta name="referrer" content="no-referrer" />
    <title>Document</title>
  </head>
  <body>
    <div id="app"></div>
    <!-- javascript -->
    <script type="module" src="./index.js"></script>
    <!-- 笔记中所有的代码都在 ./index.js 中, 然后用 vite 启动在浏览器中查看效果 -->
    <script
      src="https://lf9-cdn-tos.bytecdntp.com/cdn/expire-1-M/vue/2.6.14/vue.js"
      type="application/javascript"
    ></script>
  </body>
</html>在线文档
Vue.js 2.x
Vue.js 3.x (推荐)
vue3 在线体验
模板
v-bind :
const app = new Vue({
  el: "#app",
  // v-bind 的缩写是 :
  // 一旦绑定后, vue 就会将msg替换成 data 中 msg 变量的值
  // :style 绑定样式 :calss 绑定css类名
  template: `
  <div>
    <p v-bind:data-a="msg">绑定普通属性</p>
    <p :data-b="msg">:缩写</p>
    <p :[attrName]="msg">属性名是变量, 如果是 falsy 无法绑定成功</p>
    <hr>
    <p :style="styleStr">字符串绑定style</p>
    <p :style="{color: '#f00'}">对象语法绑定style</p>
    <hr>
    <p :class="['text-red', 'bg-black']">数组绑定className</p>
    <p :class="{'text-red': true, 'bg-black': false}">对象绑定className</p>
  </div>
  `,
  data: () => ({
    styleStr: "border: 1px solid #f00",
    attrName: "data-c",
    msg: "hello vue.js",
  }),
});

// 绑定 style
// 1. 可以拼接写行内样式字符串
// 2. 开始用对象的语法 {属性:"值"}

// 绑定 className
// 1. 使用数组语法, 将数组中所有的值都绑定到元素上
// 2. 使用对象语法, 只有属性值为 truely 才能绑定到元素上
// 绑定 className插值指令: v-text/v-html
const app = new Vue({
  el: "#app",
  template: `
  <div>
    <p v-text="str">1234</p>
    <p v-html="str">1234</p>
  </div>
  `,
  data: () => ({
    str: '<span style="color:#f00;">text text text text text text text</span>',
  }),
});

// v-text 不会解析 HTML 字符串: 类似 el.textContent = str
// v-html 会解析 HTML 字符串: 类似 el.innerHTML = str双向绑定: v-model
双向绑定就是当视图中的数据变化, data 中的数据也会发生变化, 如果 data 中的数据变化, 视图也会及时更新 官方文档
const app = new Vue({
  el: "#app",
  template: `
  <div>
    <input v-model="email" type="text" />
    <textarea v-model="intro"></textarea>
  </div>
  `,
  data: () => ({
    email: "",
    intro: "",
  }),
});

// 不能表单控件 vue.js 会使用不同的事件
// 同时忽略 value 和 selected 和 checked 等属性
// 这些可以在文档中找到条件渲染: v-if/v-show
"use strict";

const app = new Vue({
  el: "#app",
  template: `
  <div>
    <p v-if="show">渲染</p>
    <p v-if="hide">不会渲染</p>
    <p v-show="show">显示出来</p>
    <p v-show="hide">不显示但是会渲染</p>
  </div>
  `,
  data: () => ({
    show: true, // 显示
    hide: false, // 隐藏
  }),
});

// v-if: 控制是否渲染(是否会创建dom元素)
// v-show: 控制是否显示(只是控制 display 属性的值,无论显示都会创建dom元素)
// 如果要频繁的控制是否需要显示, 建议使用 v-show, 因为他并不会销毁dom元素
// 如果只是控制一次, 不需要频繁的切换, 建议使用 v-if列表渲染: v-for
v-for: 用于遍历数据, 然后渲染, 也就是所谓的: 列表渲染官方文档
const app = new Vue({
  el: "#app",
  template: `
  <div>
    <ul class="navbar-container">
      <li v-for="item of navs" :key="item.id" class="navbar-item">
        <a :href="item.href">{{ item.text }}</a>
      </li>
    </ul>
  </div>
  `,
  data: () => ({
    navs: [
      { id: 101, text: "Vue.js", link: "https://github.com/vuejs/vue" },
      {
        id: 102,
        text: "VueRouter",
        link: "https://github.com/vuejs/vue-router",
      },
      { id: 103, text: "Vuex", link: "https://github.com/vuejs/vuex" },
    ],
  }),
});

// 为什么要绑定 key 属性?
// 建议查看: https://vue3js.cn/interview/vue/key.html组件化
组件注册
注册组件和组件名的一些注意点 官方文档
// 注册全局组件(所有组件都可以使用): Vue.component(组件名, 组件)
// 注册局部组件(在哪个组件中注册就可以在哪个组件中使用): 在组件内部使用 components 选项

const Navs = {
  name: "navbar",
  template: `<ul>
    <li>首页</li>
    <li>发现</li>
    <li>商城</li>
    <li>我的</li>
  </ul>`,
};

Vue.component("global-header", {
  template: `<div>
    <p>全局 header 组件</p>
    <navs />
  </div>`,
  // 只有这个注册了 Navs, 只有这个组件可以使用,
  // 在 global-footer 和 app 根组件中都无法使用
  components: { Navs },
});

Vue.component("global-footer", {
  template: `<div>全局 footer 组件</div>`,
});

const app = new Vue({
  el: "#app",
  template: `<div>
    <global-header/>
    <global-footer/>
  </div>`,
});porps
// 使用 props 的好处:
// 一个共用的模板/样式传入不同的数据,就能渲染出不同的东西, 高度复用

// 单向数据流:
// 子组件(navs), 无法改变父组件的数据, 利于调试
// 数据只能 父组件 -> 子组件(无法修改) 这样在开发是就知道数据在哪里修改的

const Navs = {
  template: `<ul>
    <li v-for="item of courseList" :key="item.id">
      {{ item.text }}
    </li>
  </ul>`,
  props: {
    courseList: {
      type: Array,
      required: true,
    },
  },
};

Vue.component("navs", Navs);
Vue.component("global-header", {
  template: `<div>
    <p>全局 header 组件</p>
    <navs :course-list="courseList" />
  </div>`,
  data: () => ({
    courseList: [
      { id: 101, text: "js" },
      { id: 102, text: "vue.js" },
    ],
  }),
});

const app = new Vue({
  el: "#app",
  template: `<div>
    <global-header/>
    <navs :course-list="courses" />
  </div>`,
  data: () => ({
    courses: [
      { id: 201, text: "css" },
      { id: 202, text: "tialwind" },
    ],
  }),
});data
定义响应式数据, 必须是一个函数, 不能是一个对象? 否则就报错, 为什么这么设计 查看
简而言之: 因为函数有单独的作用域, 不会导致组件互相影响, 比如: 在 app 根组件中, 用了两个 navs 组件(例如:n1, n2), 现在点击 n1 组件会导致数据变化, 如果是对象, 那么两个 navs 组件(n1, n2)都会发生变化, 这就不对了, 我只想要被点击 navs 组件(n1) 发生变化, n2 没被点击就不发生变化
// ${msg} 是解析变量
// {{msg}} 是插值表达式
let msg = "hello";
Vue.component("navs", {
  template: `<div>
    <p>非响应式数据: ${msg}</p>
    <p>响应式数据: {{reactiveMsg}}</p>
    <button @click="f1">修改 msg</button>
  </div>`,
  data: () => ({
    reactiveMsg: "world",
  }),
  // data: {
  //   reactiveMsg: "world",
  // },
  methods: {
    f1() {
      msg = msg.toUpperCase();
      this.reactiveMsg = this.reactiveMsg.toUpperCase();
    },
  },
});

const app = new Vue({
  el: "#app",
  template: `<div>
    <navs />
    <hr/>
    <navs />
    <hr/>
    <navs />
  </div>`,
});methods
事件监听函数
// @ 接收事件(包括原生的事件 & 自定义事件): 绑定处理函数
// this.$emit: 向父组件发送一个自定义事件
Vue.component("navs", {
  template: `<div>
    <button @click="handleClick">点击</button>
  </div>`,
  methods: {
    handleClick() {
      console.log("子组件被点击了, 向父组件发送一个自定义事件");
      // $emit(事件名, 携带的数据)
      // 携带的数据可以在父组件中接收到
      this.$emit("nav-click", { a: 1 });
    },
  },
});

const app = new Vue({
  el: "#app",
  template: `<div>
    <button @click="f1">App</button>
    <navs @nav-click="f2" />
  </div>`,
  methods: {
    f1() {
      console.log("原生事件");
    },
    f2(e) {
      console.log("子组件发送的自定义事件");
      console.info(e); // 子组件传递的数据
    },
  },
});watch
监听数据变化
const app = new Vue({
  el: "#app",
  template: `<div>
    <p>{{msg}}</p>
    <button @click="updateMsg">修改数据</button>
  </div>`,
  data: () => ({
    msg: "hello world",
    info: {
      email: "",
    },
  }),
  methods: {
    updateMsg() {
      const randStr = Math.random().toString(16).substring(2);
      this.msg = randStr;
      this.info.email = randStr + "@foxmail.com";
    },
  },
  watch: {
    // 监听 msg 属性变化
    msg(newval, oldVal) {
      // newval: 修改后的值 oldval: 修改前的值
      console.log("newval, oldVal: ", { newval, oldVal });
    },

    // 监听 info 对象的 email 属性变化, 'info.email'
    "info.email"(newval, oldVal) {
      // 数据改变就会执行, 不管是否渲染到 模板中
      console.info("数据改变了");
    },
  },
});computed
计算属性, 相对于 methods 来说具有缓存的作用
const app = new Vue({
  el: "#app",
  template: `<div>
    <p>计算属性: {{ fullName }}</p>
    <button @click="updateData">修改数据</button>
    <button @click="setFullName">设置计算属性</button>
  </div>`,
  data: () => ({
    firstName: "hello",
    lastName: "world",
  }),
  methods: {
    updateData() {
      this.firstName = "Hello";
    },
    setFullName() {
      this.fullName += "( computed )";
    },
  },
  computed: {
    fullName: {
      get() {
        // 获取计算属性的时候调用: {{ fullName }}
        // 或者 依赖的数据更新就调用(firstName/lastName)
        console.info("getter");
        return this.firstName + "-" + this.lastName;
      },
      set(v) {
        // 设置 计算属性的时候会调用, this.fullName = xxx
        console.info("setter:", v);
      },
    },
  },
});lifecycle 生命周期(2.x 版本)
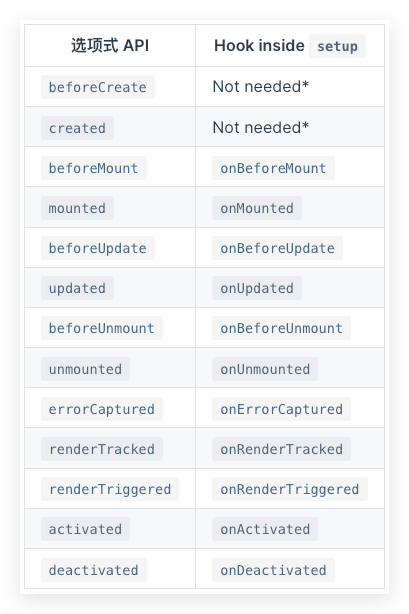
- beforeCreate: 组件创建之前
- created: 组件创建之后
- beforeMount: 组件挂载之前(vnode 已经替换完成, 但是还没有渲染到页面上)
- mounted: 组件挂载之后, 可以获取到 dom
- beforeUpdate: 组件数据变化, 更新之前
- updated: 组件数据变化, 更新之后
- beforeDestroy: 组件销毁之前
- destroyed: 组件销毁之后
Vue.component("navs", {
  props: ["msg"],
  template: `<div> {{msg}} </div>`,
  beforeCreate() {
    console.info("beforeCreate");
  },
  created() {
    console.info("created");
  },
  beforeMount() {
    console.info("beforeMount");
  },
  mounted() {
    console.info("mounted");
  },
  beforeUpdate() {
    console.log("beforeUpdate");
  },
  updated() {
    console.log("updated");
  },
  beforeDestroy() {
    console.log("beforeDestroy");
  },
  destroyed() {
    console.log("destroyed");
  },
});

const app = new Vue({
  el: "#app",
  template: `<div>
    <div v-if="show">
      <navs :msg="msg" />
    </div>
    <button @click="toggle">切换状态</button>
    <button @click="changeData">修改数据</button>
  </div>`,
  data: () => ({
    msg: "message",
    show: true,
  }),
  methods: {
    changeData() {
      this.msg = Math.random().toString(16).substring(2);
    },
    toggle() {
      this.show = !this.show;
    },
  },
});lifecycle 生命周期(3.x 版本 hooks)
vue3.x 这些 hooks 只能在 setup 函数中调用
const { reactive, onBeforeMount, onMounted, ojnBeforeUpdate, onUpdated, onBeforeUnmount, onUnmounted } = Vue;

const Home = {
  template: `<div>
    <p>{{state.msg}}</p>
    <button @click="updateData">修改数据</button>
  </div>`,
  setup() {
    const state = reactive({
      msg: "hello",
    });
    onBeforeMount(() => {
      console.log("beforeMount");
    });
    onMounted(() => {
      console.log("mounted");
    });
    onBeforeUpdate(() => {
      console.log("beforeUpdate");
    });
    onUpdated(() => {
      console.log("updated");
    });
    onBeforeUnmount(() => {
      console.log("beforeUnmount");
    });
    onUnmounted(() => {
      console.log("unmounted");
    });

    function updateData() {
      state.msg = Math.random().toString(16).substring(2);
    }

    return {
      state,
      updateData,
    };
  },
};

const App = {
  template: `<div>
    <div v-if="state.show">
      <home />
    </div>
    <button @click="toggle">切换组件是否渲染</button>
  </div>`,
  components: { Home },
  setup() {
    const state = reactive({
      show: true,
    });

    function toggle() {
      state.show = !state.show;
    }

    return {
      state,
      toggle,
    };
  },
};

Vue.createApp(App).mount("#app");插槽
// 具名插槽: 有名字的插槽
// 默认插槽: 默认的插槽, 不需要指定插槽名称

Vue.component("base-layout", {
  template: `<div>
    <header>
      <slot name="header" />
    </header>
    <main>
      <slot />
    </main>
    <footer>
      <slot name="footer" />
    </footer>
  </div>`,
});

const app = new Vue({
  el: "#app",
  template: `<div>
    <base-layout>
      <template v-slot:header> 这是头部 </template>
      <p>中间内容部分1</p>
      <p>中间内容部分2</p>
      <p>中间内容部分3</p>
      <template v-slot:footer> footer 底部 </template>
    </base-layout>
  </div>`,
  data: () => ({
    msg1: "<div>hello</div>",
    msg2: '<a href="https://github.com">github</a>',
  }),
  methods: {
    toggle() {
      this.show = !this.show;
    },
  },
});组件通信
props + emit
主要用于父子组件传值, 非常方便, 但是同级组件传值就维护非常麻烦
父组件给子组件传递数据(size 和 color): props
<template>
  <div>
    <h2>Props + Emit</h2>
    <div class="btns">
      <x-button @xbtn-click="handleClick" size="small">小按钮</x-button>
      <x-button @xbtn-click="handleClick" size="big">大按钮</x-button>
      <x-button @xbtn-click="handleClick" color="danger">中按钮</x-button>
      <x-button @xbtn-click="handleClick" color="info">中按钮</x-button>
      <x-button @xbtn-click="handleClick" color="warning">中按钮</x-button>
      <x-button @xbtn-click="handleClick" color="primary">中按钮</x-button>
      <x-button @xbtn-click="handleClick" color="success">中按钮</x-button>
    </div>
  </div>
</template>

<script>
  import XButton from "./XButton.vue";
  export default {
    components: { XButton },
    methods: {
      handleClick(e) {
        console.info(e.target);
      },
    },
  };
</script>

<style lang="scss" scoped>
  .btns button {
    margin-right: 20px;
  }
</style>组建给父组件传递数据 $this.emit 发射自定义事件
在子组件中不要直接修改 props 数据, 这会破坏单向数据流的规范, 导致维护时, 不知道数据在哪个子组件中修改的, 而且, 直接修改 props vue 是会报错的
<template>
  <button :class="classNames" @click="emitClick">
    <slot>XButton</slot>
  </button>
</template>

<script>
  export default {
    name: "XButton",
    props: [
      "size", // 控制按钮大小
      "color", // 控制按钮颜色
    ],
    methods: {
      emitClick(event) {
        this.$emit("xbtn-click", event);
      },
    },
    computed: {
      classNames() {
        const allowColors = ["info", "danger", "warning", "primary", "success"];
        const allowSizes = ["big", "middle", "small"];
        const color = allowColors.includes(this.color) ? this.color : "info";
        const size = allowSizes.includes(this.size) ? this.size : "middle";
        return [color, size];
      },
    },
  };
</script>

<style lang="scss" scoped>
  button {
    margin: 0;
    padding: 0;
    border: none;
    color: #fff;
    border-radius: 2px;
    cursor: pointer;
  }
  .big {
    padding: 20px 45px;
  }
  .middle {
    padding: 10px 25px;
  }
  .small {
    padding: 5px 15px;
  }
  .primary {
    background: #3f9eff;
  }
  .danger {
    background: #f42c2e;
  }
  .info {
    background: #909399;
  }
  .warning {
    background: #feb03b;
  }
  .success {
    background: #67c23a;
  }
</style>vuex / pinia
官方推荐使用
- vuex: https://vuex.vuejs.org/zh/
- pinia: https://pinia.vuejs.org/introduction.html
- pinia 中文: https://pinia.web3doc.top/introduction.html
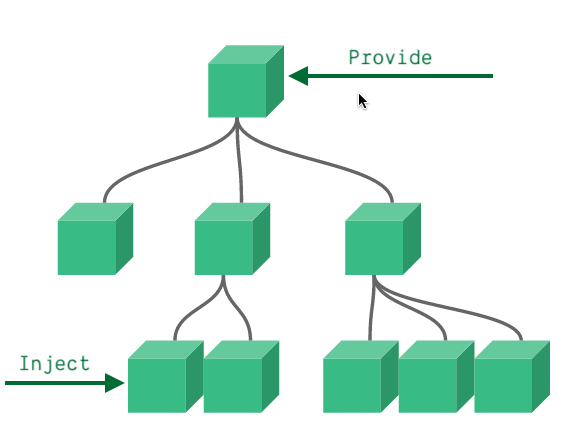
provider + inject
弊端很大, 知道在哪注入的, 不知道数据在哪改的, 不推荐使用, 建议使用 Vuex
而且注入的数据默认不是响应式的
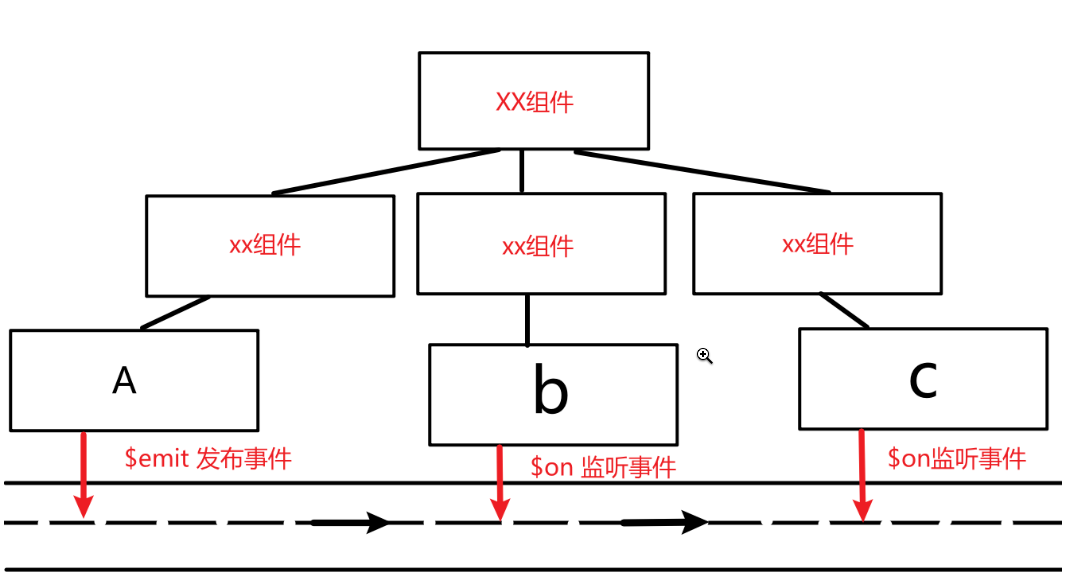
eventBus
主要依靠发布订阅模式来实现, 弊端也很大, 因为所有的事件都是在全局下的
递归组件
一般用于组件不确定数据到底有多少层级, 比如无限分类的树形结构数据
<template>
  <div>
    <h2>MenuTree</h2>
    <menu-tree :data="menus" />
  </div>
</template>

<script>
  import MenuTree from "./MenuTree.vue";
  export default {
    components: { MenuTree },
    data: () => ({
      menus: [
        {
          id: 1,
          title: "菜单-1",
        },
        {
          id: 2,
          title: "菜单-2",
          children: [
            {
              id: 21,
              title: "菜单-2-1",
            },
            {
              id: 22,
              title: "菜单-2-2",
              children: [
                {
                  id: 221,
                  title: "菜单-2-2-1",
                },
                {
                  id: 222,
                  title: "菜单-2-2-2",
                },
                {
                  id: 223,
                  title: "菜单-2-2-3",
                },
              ],
            },
            {
              id: 23,
              title: "菜单-2-3",
            },
          ],
        },
        {
          id: 3,
          title: "菜单-3",
        },
      ],
    }),
  };
</script><template>
<div class="menu-tree-container">
<div class="menu" v-for="menu of data" :key="menu.id">
<!-- 普通item -->
<div class="menu-item">
<span> {{ menu.title }} </span>
<span v-if="menu.children" class="icon">></span>
</div>
<!-- 有子选项的 item, 递归的渲染所有子选项 -->
<div v-if="menu.children" class="sub-menus">
<menu-tree :data="menu.children" />
</div>
</div>
</div>
</template>
<script>
export default {
name: "MenuTree", // 必须指定name, 否则无法在本组件 template 中使用 <menu-tree> 组件
props: ["data"],
};
</script>
<style lang="scss" scoped>
.menu {
width: 200px;
background: #000;
text-align: left;
color: #fff;
position: relative;
padding: 0 10px;
box-sizing: border-box;
.menu-item {
margin: 0;
padding: 0;
line-height: 50px;
position: relative;
.icon {
position: absolute;
top: 0;
right: 0;
}
}
.sub-menus {
position: absolute;
top: 0;
left: 100%;
}
}
</style>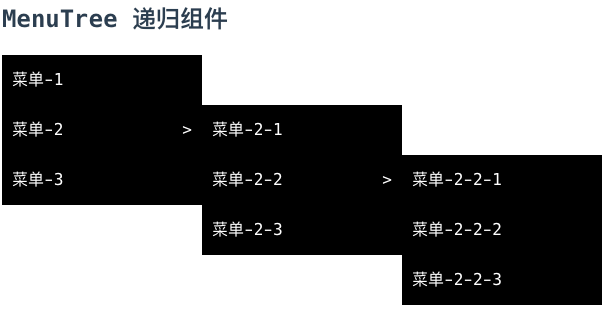
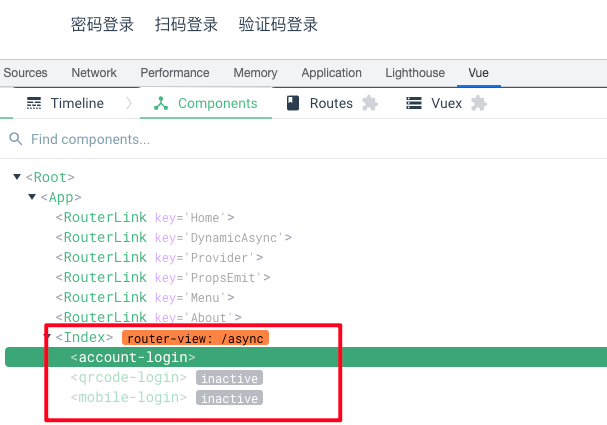
动态组件
动态组件: 就是由内置的 Component 组件来渲染, 而不是直接渲染, 在运行时可能改变的组件, 非常类似 v-if 的效果
组件缓存: 就是切换组件时, 不会直接销毁组件, 而是缓存组件的vnode, 类似 v-show 的效果, 但是实现的原理不一样
动态组件 Component
<template>
  <div>
    <h2>动态组件 & 异步组件</h2>
    <div class="tab-container">
      <ul class="tabs">
        <li
          class="tab-item"
          v-for="tab of tabs"
          :key="tab.componentName"
          :class="{
            'active-tab': currentTab.componentName === tab.componentName,
          }"
          @click="changeTab(tab)"
        >
          {{ tab.title }}
        </li>
      </ul>
      <div class="tab-content">
        <component :is="currentTab" />
        <!-- component 和 v-if 的效果非常相似 -->
        <!-- <account-login v-if="currentTab === 'account-login'" /> -->
        <!-- <qrcode-login  v-if="currentTab === 'qrcode-login'" /> -->
        <!-- <mobile-login  v-if="currentTab === 'mobile-login'" /> -->
      </div>
    </div>
  </div>
</template>

<script>
  const AccountLogin = {
    name: "account-login",
    template: `<h2>账号密码登录内容部分</h2>`,
  };
  const QrcodeLogin = {
    name: "qrcode-login",
    template: `<h2>扫码登录内容部分</h2>`,
  };
  const MobileLogin = {
    name: "mobile-login",
    template: `<h2>手机验证码登录内容部分</h2>`,
  };
  export default {
    components: {
      AccountLogin,
      QrcodeLogin,
      MobileLogin,
    },
    data: () => ({
      tabs: [
        { title: "密码登录", componentName: "account-login" },
        { title: "扫码登录", componentName: "qrcode-login" },
        { title: "验证码登录", componentName: "mobile-login" },
      ],
      currentTab: "account-login",
    }),
    methods: {
      changeTab(tab) {
        this.currentTab = tab.componentName;
      },
    },
  };
</script>

<style lang="scss" scoped>
  .tabs {
    display: flex;
    &,
    .tab-item {
      list-style: none;
      margin: 0;
      padding: 0;
    }
    .tab-item {
      margin-right: 20px;
      cursor: pointer;
    }
  }
</style>组件缓存 Component & keep-alive
<!-- ... -->
<div class="tab-content">
  <keep-alive>
    <component :is="currentTab" />
  </keep-alive>
  <!-- component 和 v-show 的效果非常相似 -->
  <!-- <account-login v-show="currentTab === 'account-login'" /> -->
  <!-- <qrcode-login  v-show="currentTab === 'qrcode-login'" /> -->
  <!-- <mobile-login  v-show="currentTab === 'mobile-login'" /> -->
</div>
<!-- ... -->
异步组件
所谓异步组件就是利用 ESModule 可以动态加载的特性, 在代码运行选择是否要加载组件, 而不是在加载的时候, 直接加载
异步组件不会直接打包到 main.js 中, 而是会单独打包, 因为需要在运行时单独加载
被异步加载的组件 XButton.vue
<!-- XButton.vue -->
<template>
  <button :class="classNames" @click="emitClick">
    <slot>XButton</slot>
  </button>
</template>

<script>
  export default {
    name: "XButton",
    props: [
      "size", // 控制按钮大小
      "color", // 控制按钮颜色
    ],
    methods: {
      emitClick(event) {
        this.$emit("xbtn-click", event);
      },
    },
    computed: {
      classNames() {
        const allowColors = ["info", "danger", "warning", "primary", "success"];
        const allowSizes = ["big", "middle", "small"];
        const color = allowColors.includes(this.color) ? this.color : "info";
        const size = allowSizes.includes(this.size) ? this.size : "middle";
        return [color, size];
      },
    },
  };
</script>

<style lang="scss" scoped>
  button {
    margin: 0;
    padding: 0;
    border: none;
    color: #fff;
    border-radius: 2px;
    cursor: pointer;
  }
  .big {
    padding: 20px 45px;
  }
  .middle {
    padding: 10px 25px;
  }
  .small {
    padding: 5px 15px;
  }
  .primary {
    background: #3f9eff;
  }
  .danger {
    background: #f42c2e;
  }
  .info {
    background: #909399;
  }
  .warning {
    background: #feb03b;
  }
  .success {
    background: #67c23a;
  }
</style>路由
const routes = [
{
path: "/",
name: "Home",
component: Home,
},
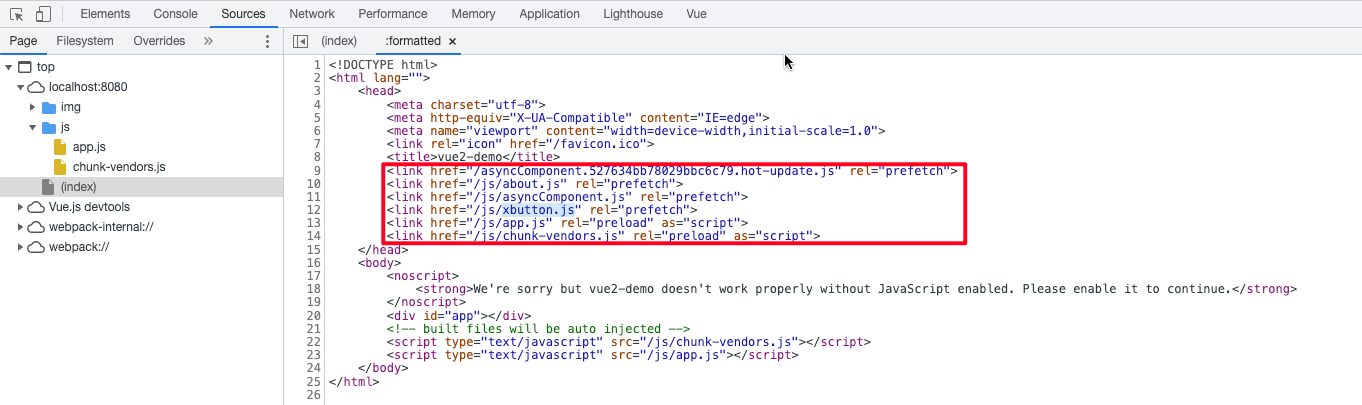
{
path: "/async",
name: "AsyncComponent",
component: () => import(/* webpackChunkName: "async-comp" */ "../views/async/index.vue"),
// 这个注释 /* webpackChunkName: "xbutton" */
// 是用来指定 webpack 打包的时候, 将这个.vue 文件打包后输出的名字 xbutton.js
// 异步加载: 只有 vue-router 导航到当前页面的时候才会加载 xbutton.js,
// 在其他页面的时候不会加载这个js文件
},
];Vue2异步组件
一个也页面中, 某个组件异步加载
<template>
  <div>
    <h2>Vue 2 Async Component</h2>
    <x-button></x-button>
  </div>
</template>

<script>
  export default {
    components: {
      // 这个注释 /* webpackChunkName: "xbutton" */
      // 是用来指定 webpack 打包的时候, 将这个.vue 文件打包后输出的名字 xbutton.js
      // 异步加载: 只有 vue-router 导航到当前页面的时候才会加载 xbutton.js,
      // 在其他页面的时候不会加载这个js文件
      "x-button": () => import(/* webpackChunkName: "xbutton" */ "./XButton.vue"),
    },
  };
</script>Vue3异步组件
<template>
  <div>
    <h2>Vue 3 Async Component</h2>
    <x-button></x-button>
  </div>
</template>

<script setup>
  import { defineAsyncComponent } from "vue";
  const XButton = defineAsyncComponent({
    loader: () => import(/* webpackChunkName: "xbutton" */ "./XButton.vue"),
    // loadingComponent: loadingComponent,
    // errorComponent: errorComponent,
    delay: 100,
    timeout: 3000,
    suspensible: false,
    onError(error, retry, fail, attempts) {
      if (error.message.match(/fetch/) && attempts <= 3) {
        retry();
      } else {
        fail();
      }
    },
  });
</script>静态加载和异步加载的实现原理
- 利用 link 标签异步加载(不会阻塞) js 文件(异步组件打包后的js文件)
- 当路由匹配到对应组件的时候, 如果这个组件是异步的, 会再次请求. 此时:因为(link prefetch)请求过一次了, 默认情况下会有缓存, 所以速度就会特别快, 而且还不影响正常使用
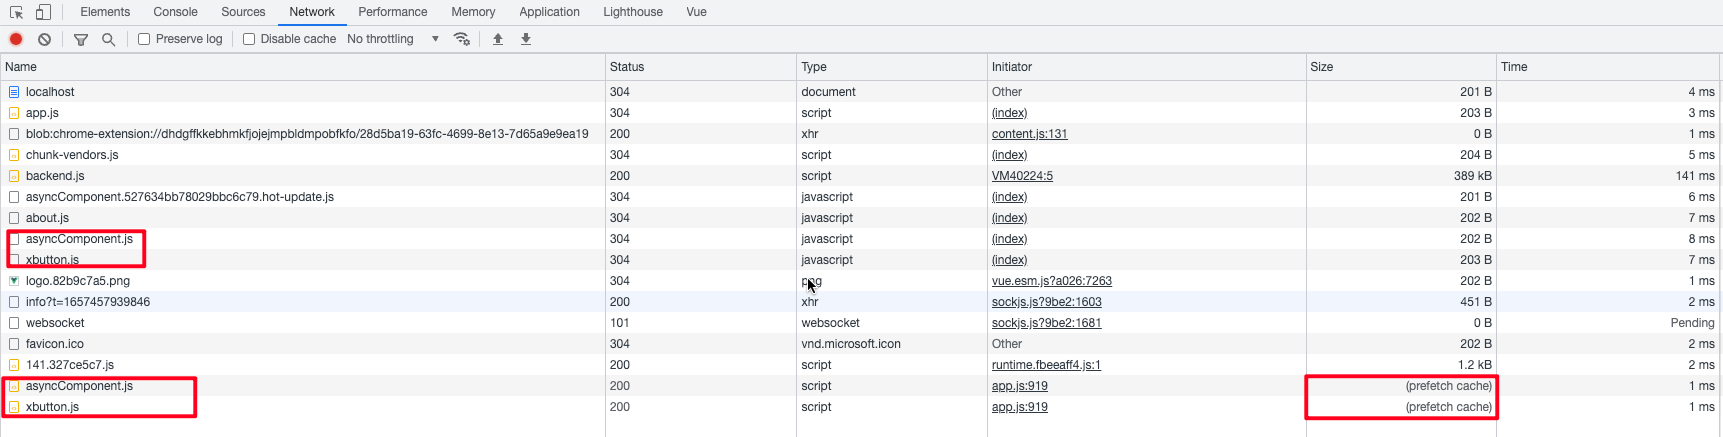
为什么要使用异步加载?
- 因为所有的文件都会打包成js, 打包后的文件会放到一个js文件中, 同步文件非常多, 就会导致这个文件特别大, 就导致加载速度慢
- 使用异步组件可以将一部分暂时用不到的一部加载, 等需要的时候在请求一次就行了
为什么要请求两次?
- 第一次加载是为了速度, link 标签异步请求不会阻塞, 第二次请求的时候就直接使用缓存了, 速度非常快
- 第二次加载是为了确保正确的加载出来, 如果禁用了浏览器缓存, 第二次请求就可以确保数据能够正常的加载出来