容器数据卷
什么是容器数据库
docker 是将整个应用和环境打包成一个个镜像, 但是数据不应该直接存储在 docker 容器中, 如果删除容器所有数据都会丢失, 这就不科学, 而且, 不可能每次修改个配置文件就进入 docker 去修改, 所有就有了容器的数据卷的概念, 将 docker容器中目录通过挂载的方式同步到 linux 主机上
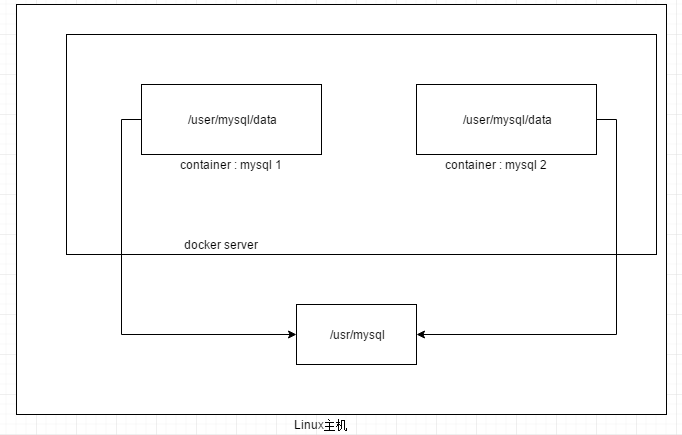
容器的数据持久化和同步操作, 容器与容器之间可以实现数据共享, 简单理解: 功能就类似于虚拟机的共享目录, 无论是在主机中修改文件还是在容器中修改文件, 另外一方都会自动同步, 功能效果就类似于 vue.js 的双向绑定
为啥要使用容器卷
- 数据同步到主机, 删除容器数据不会丢失
- 映射容器内部程序的一些配置文件, 而不是每次都进入容器中去修改配置文件
使用容器数据卷
使用命令挂载的方式来使用
shell
# sudo docker run -v 主机目录:容器目录
sudo docker run -it -v /home/centos_test:/home centos bashdocker volume 查看挂载卷的信息
shell
# 查看所有挂载的卷
docker volume ls

# 查看指定卷的详细信息
docker volume inspect 卷名 # 如果是匿名挂载就会自动生成一个卷名具名挂载和匿名挂载
匿名挂载
shell
# 命令格式: docker run -v 容器目录 容器名
sudo docker run -d -p 80:80 -v /etc/nginx nginx

# 查看挂载的 volume 的信息
sudo docker volume ls

# 测试输出信息如下:
[root@localhost ~]# docker run -d -p 80:80 --name ngx1 -v /etc/nginx nginx
cd90bf66b92a451f65d52e4869c73280ea58c12123ceb72de833fdf4169d7af6
[root@localhost ~]# docker ps
CONTAINER ID        IMAGE               COMMAND                  CREATED             STATUS              PORTS                NAMES
cd90bf66b92a        nginx               "/docker-entrypoint.…"   5 seconds ago       Up 4 seconds        0.0.0.0:80->80/tcp   ngx1
[root@localhost ~]# docker volume ls
DRIVER              VOLUME NAME
local               1d124d89ac098b407e80adcd86922164a60602455fee34179199ab08812ac296
local               2c3f46779161f45dbef23af9f34478ff240f67f4bf7043cae613918a4667006d
local               28e2fd966d83e8fb57b8d8943f3a12b9ecdfb56c5679dca15f580f23f2a782d8
local               50bc60497f278e3b584db3fa25ded4d224a400b95634332613f54e579672433d
local               344a8a25ee00ec7596fbbfb34cf88d2e08e761f862189d70fe0689e4e9d45224
local               bf24fe2f8341f185d417159fa230211d24e75c65bf5a33aa17296165edc63bca
local               ca3508e26645a4c9b67057e9f4a71e92769d6bc98e7781dd63a4b127531277d6
local d822668f2f1615ed4df85a55f33f8ae1af4d8053b1780809a25cd493b682a044具名挂载
shell
# 命令格式: docker run -v 卷名:容器目录 容器名
# 注: 卷名 不能以 / 开头, 否则会识别为主机目录

sudo docker run -d -p 80:80  -v nginx-conf:/etc/nginx --name ngx2 nginx

# 查看挂载的 volume 的信息
sudo docker volume ls

# 测试输出如下:
[root@localhost ~]# docker volume ls
DRIVER              VOLUME NAME
local               1d124d89ac098b407e80adcd86922164a60602455fee34179199ab08812ac296
local               2c3f46779161f45dbef23af9f34478ff240f67f4bf7043cae613918a4667006d
local               28e2fd966d83e8fb57b8d8943f3a12b9ecdfb56c5679dca15f580f23f2a782d8
local               50bc60497f278e3b584db3fa25ded4d224a400b95634332613f54e579672433d
local               344a8a25ee00ec7596fbbfb34cf88d2e08e761f862189d70fe0689e4e9d45224
local               bf24fe2f8341f185d417159fa230211d24e75c65bf5a33aa17296165edc63bca
local               ca3508e26645a4c9b67057e9f4a71e92769d6bc98e7781dd63a4b127531277d6
local               d822668f2f1615ed4df85a55f33f8ae1af4d8053b1780809a25cd493b682a044
local               nginx-conf # 发现有一个nginx-conf 的卷名

# 查看这个卷名的详细信息输出如下:
[root@localhost ~]# sudo docker volume inspect nginx-conf
[
    {
        "CreatedAt": "2020-07-11T07:47:35-04:00", # 创建时间
        "Driver": "local",
        "Labels": null,
        "Mountpoint": "/var/lib/docker/volumes/nginx-conf/_data", # 主机目录
        "Name": "nginx-conf", # 卷名
        "Options": null,
        "Scope": "local"
    }
]总结: 各种挂载方式
shell
-v 容器路径         # 匿名挂载
-v 卷名:容器路径     # 具名挂载
-v 主机路径:容器路径 # 指定路径挂载(常用)扩展: 挂载权限
shell
# 只读权限: 如果设置, 容器内部就无法直接修改挂载卷的内容
-v 主机路径:容器路径:ro

# 读写权限
-v 主机路径:容器路径:ro使用 Dockerfile 的方式来挂载容器卷
- Dockerfile 是什么?
- 如何通过 Dockerfile 来构建 docker 镜像?
- 运行构建的镜像并进入容器中查看是否有挂载的卷
volume01和volumn02
Dockerfile 就是构建 docker 容器的脚本文件, 通过执行脚本可以生成 docker 镜像
如何通过 Dockerfile 来构建 docker 镜像:
shell
# 1. 新建 Dockerfile 文件并写入一下内容:

FROM centos                       # 基础镜像
VOLUME ["volume01", "volumn02"]   # 挂载的卷
CMD echo "--- suceess ---"        # 成功之后执行 echo 命令输出提示
CMD /bin/bash                     # 默认使用 bash 终端


# 2. build 一个镜像
# docker build -f 指定Dockerfile路径 -t 进行的名称:版本标签  命令执行的目录.是当前目录
sudo docker build -f ./Dockerfile -t test-centos:1.0 .

# 测试输出如下:
[root@localhost docker-test-volume]# docker build -f /root/docker-test-volume/Dockerfile -t test-centos:1.0  .
Sending build context to Docker daemon  2.048kB
Step 1/4 : FROM centos
 ---> 831691599b88
Step 2/4 : VOLUME ["volume01", "volumn02"]
 ---> Running in f6c23eac029c
Removing intermediate container f6c23eac029c
 ---> ea90c450d6c4
Step 3/4 : CMD echo "--- suceess ---"
 ---> Running in 37cdba12e1fd
Removing intermediate container 37cdba12e1fd
 ---> 619c80c91e7d
Step 4/4 : CMD /bin/bash
 ---> Running in 1a0feb113e70
Removing intermediate container 1a0feb113e70
 ---> 89486dbf3964
Successfully built 89486dbf3964
Successfully tagged test-centos:1.0


# 3.查看镜像, 发现已经
[root@localhost docker-test-volume]# docker images
REPOSITORY          TAG                 IMAGE ID            CREATED             SIZE
test-centos         1.0                 89486dbf3964        2 minutes ago       215MB
nginx               latest              0901fa9da894        16 hours ago        132MB
centos              latest              831691599b88        3 weeks ago         215MB


# 4. 启动并且进入容器, 查看是否有挂载的 `volume01` 和 ``volume01` `
[root@localhost docker-test-volume]# docker run -it test-centos:1.0 bash
[root@2035ee388b6f /]# ls
bin  dev  etc  home  lib  lib64  lost+found  media  mnt  opt  proc  root  run  sbin  srv  sys  tmp  usr  var  volume01	volumn02