在线文档
笔记对应的代码
将项目部署到 GitLab Pages
说明: 跟 Github Actions 一样还是部署 vitepress 项目
注意:
公司内部的文档项目可能是这样部署的, 如果用的是社区免费版本自建的 gitlab 服务器, 那么需要登录管理员去开启 Pages 功能, 因为 Pages 功能默认是关闭的, 如果只是学习 的话, 建议直接使用 gitlab.com
1.修改 vitepress 配置
修改 outDir 字段, 参考官方文档
export default {
  outDir: '../public',
};注意与 Github Pages 的不同, 不需要设置
base字段
因为 Github Pages 生成的域名是这样的 https://<user-name>.github.io/<repo-name>
而 GitLab pages 生成的域名是这样的 https://<repo-name>-<username>-<hash>.gitlab.io
所以 Github Pages 是必须设置 base 字段的, 但是 GitLab Pages 是不需要的, 你可以查看 vitepress 文档
- <user-name>: 平台账号名
- <repo-name>: 仓库名
- <hash>: 随机30位字符串
为什么要修改
outDir字段?
经测试, 不改成 ../public 无法部署成功, 所以就必须设置 vitepress 打包结果输出目录
2.创建 gitlab CICD 配置文件
在项目根目录下新建 .gitlab-ci.yml 内容如下:
# 配置文件字段可参考: https://docs.gitlab.cn/jh/ci/yaml/gitlab_ci_yaml.html
# 使用的容器: https://hub.docker.com/_/node
# 使用的容器的版本tag: 18
image: node:18

# 定义阶段
stages:
  - build
  - deploy

# 缓存: 会计算 package.json 的 md5 值, 如果没有变化就使用缓存
cache:
  key:
    files:
      - package.json
  paths:
    - node_modules

# 定义任务(必须叫这个名字): 发布到 Gitlab Pages
pages:
  stage: build
  script: |
    npm install
    npm run docs:build
    echo "===== build completed =====";

  # 产出的结果
  artifacts:
    paths:
      - ./public

  # 当提交 main 分支代码的时候执行
  only:
- mainimage: node:18
pages:
cache:
paths:
- node_modules/
script:
# - apk add git # Uncomment this if you're using small docker images like alpine and have lastUpdated enabled
- npm install
- npm run docs:build
artifacts:
paths:
- public
only:
- main3. 运行&查看 gitlab runner 执行和输出

将项目部署到服务器
0.准备步骤
- 准备一台公网能够访问的服务器
- 对 gitlab cicd 有大致的了解
- 了解 linux 命令
1.修改 .vitepress 配置
如果已经修改过就不用再修改了, 虽然不修改目录也能部署, 但是为了和前面 部署到 GitLab Pages 保持一致, 还是修改下
export default {
  outDir: '../public',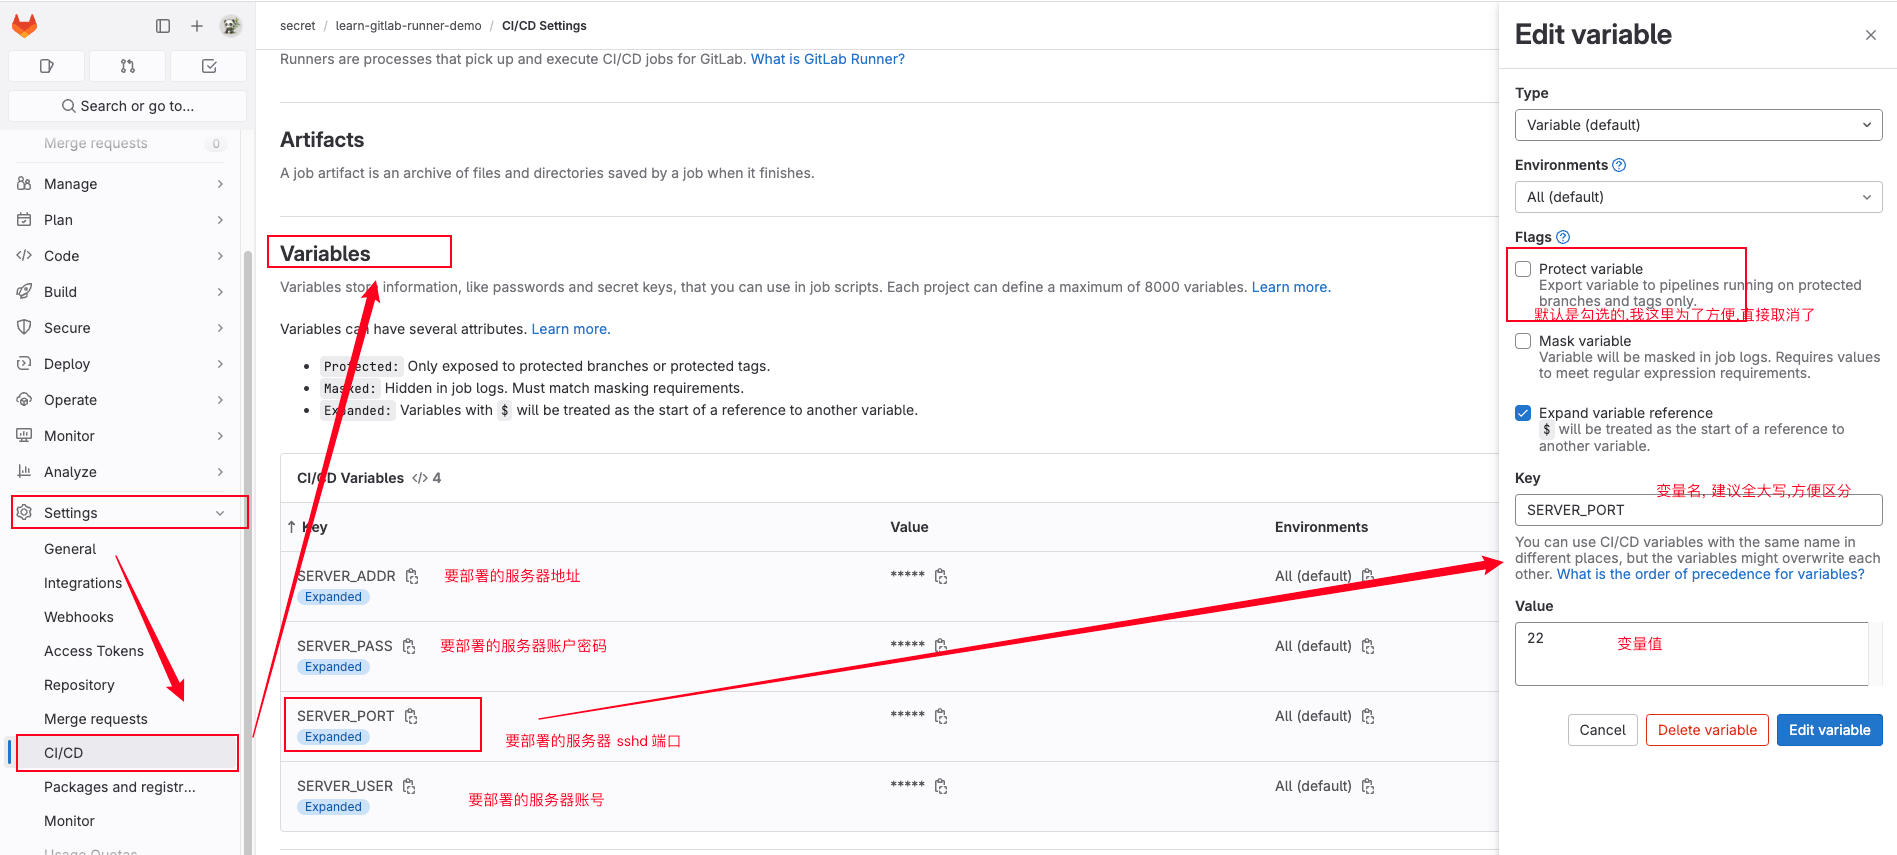
};2.创建 cicd variables
就是类似 github 的那个 Repository Secrets, 功能是一样的, 名字不同, 都是给配置文件提供变量来存储一些不方便暴露配置
3.创建 cicd 流水线配置文件
在项目的根目录下创建 .gitlab-ci.yml 配置文件
image: node:18
# 定义阶段
stages:
- build
- deploy
# 缓存(不要重复下载 node_modules)
cache:
key:
files:
- package.json
paths:
- node_modules
# 发布到 gitlab-pages(提交 main 分支的时候执行)
pages:
stage: build
script: |
npm install
npm run docs:build
echo "===== build completed =====";
artifacts:
paths:
- ./public
only:
- main
# 定义任务(build_jobs)
build_jobs:
stage: build
script: |
# 安装依赖
npm install
为什么要将命令分这么多步骤, 并且输出?
因为是学习阶段, 还不熟练, 为了好排查错误, 如果报错了, 就知道到底是哪个步骤报错了, 当写熟练了之后, 就可以不用怎么繁琐了
4.创建执行部署的 shell 脚本
在项目的根目录下创建 run.sh
#!/bin/bash

# 定义docker 镜像名 和 容起名 变量
docker_container_name="learn-gitlab-runner-demo"
docker_image_name="nginx:stable"

# 先停止原来的
docker stop $docker_container_name
docker rm $docker_container_name

# 启动容器(注意路径)
docker run -d \
	-p 80:80 \
	-v $(pwd)/public:/usr/share/nginx/html \
--name $docker_container_name $docker_image_name5.执行/查看流水线任务
注: 必须提交代码到 deploy2server 这个分支才能执行, 因为触发条件是写在 .gitlab-ci.yml 文件中的

扩展: 使用 ssh 私钥链接服务器
为什么我没有用这种方式来操作?
因为用用户名密码的方式更直观, 做笔记利于阅读, 但是在那个 learn-gitlab-cicd-demo 项目中, 有个 deploy_with_ssh_key 分支, 里面有对应的注释和示例
如果要在 gitlab 中使用私钥链接服务器, 在添加 cicd variables 的时候必须要在私钥的内容最后添加一行空格,否则会报错,密钥格式有误
image: node:18
stages:
- build
- deploy
cache:
key:
files:
- package.json
paths:
- node_modules
# 打包任务
build_jobs:
stage: build
script: |
npm install
npm run docs:build
tar -zcvf artifacts.tar ./run.sh ./public/*
ls -al
echo "===== build completed =====";
artifacts:
paths:
- ./artifacts.tar
only:
- deploy2server
- deploy_with_ssh_key
# 发布到指定服务器, 并且使用 ssh private key
deploy_with_ssh_key_jobs:
# 在部署阶段执行
stage: deploy
使用自建的 Gitlab
因为很多公司服务器是自己搭建 gitlab 服务器, 一是为了安全, 二是为了更好的性能
gitlab.com 提供的 runner 使用限制比较大, 而且服务器在国外部署的时候速度会比较慢
GitLab CICD 的执行原理
gitlab 是无法直接运行流水线任务的, 它必须要通过一个 gitlab-runner 的软件来运行, 如下图

使用 docker-compose 自建 gitlab 服务器
需要确保服务器已经安装了 docker 和 docker-compose
1. 创建 docker-compose.yml, 内容如下:
version: '3.6'

services:
  gitlab-web:
    image: 'gitlab/gitlab-ce:15.11.13-ce.0'
    container_name: gitlab-web
    restart: always
    hostname: 'gitlab.liaohui5.cn'
    environment:
      GITLAB_OMNIBUS_CONFIG: |
        external_url 'https://gitlab.liaohui5.cn'
        gitlab_rails['gitlab_shell_ssh_port'] = 2233
    ports:
      - '4433:443'
      - '2233:22'
    volumes:
      - './config:/etc/gitlab'
      - './logs:/var/log/gitlab'
      - './data:/var/opt/gitlab'
    shm_size: '256m'

  gitlab-runner:
    image: 'gitlab/gitlab-runner:ubuntu-v15.11.0'
    restart: always
    container_name: gitlab-runner
    depends_on:
      - gitlab-web
    privileged: true
    volumes:
      - ./gitlab-runner-config:/etc/gitlab-runner
      - /var/run/docker.sock:/var/run/docker.sock
- /bin/docker:/bin/docker2. 注意修改 /var/run/docker.sock 的权限
chmod 777 /var/run/docker.sock3. 启动服务
这个时间可能比较久(具体需要多久, 取决于服务器的性能)
docker up -d4. 获取 root 账户密码
注: 一定要记得重新设置 root 密码, 这个文件会在 24 小时后消失
# gitlab-web: 是你的容器名
sudo docker exec -it gitlab-web grep 'Password:' /etc/gitlab/initial_root_password5.修改 root 账户密码

注册 Runner
注意: 在注册之前, 最好是先获取注册 runner 需要的参数: gitlab url registration token
- gitlab instance url: 就是你的 gitlib 的网址, 如:
https://gitlab.example.com - registration token: 是必须的参数, token 可以让 github-runner 识别, 注册的是什么类型的 runner(全局/某个项目/某个组)
如何注册全局共享 runner?
需要管理员权限, 才能注册, 需要更多信息, 请查看文档

如何注册项目专属的 Runner?
不要随便执行你不信任的 runner, 最好只执行自己服务器上的 runner

执行注册
docker run --rm -v ./gitlab-runner-config:/etc/gitlab-runner gitlab/gitlab-runner:ubuntu-v15.11.0 register
  --non-interactive \
  --url "https://gitlab.example.com/" \       # 你的 gitlab 地址
  --registration-token "your-token-string" \  # 你的 registration token
  --description "docker-runner" \             # runner的描述
  --tag-list "docker,aws" \                   # runner的标签列表,用逗号隔开
  --executor "docker" \                       # runner执行方式(推荐docker)
  --docker-image node:18 \                    # runner基于的镜像
  --run-untagged="true" \
  --locked="false" \
  --access-level="not_protected"